A Blog Concerning All Updates On Tech News, Blogging Tips, New Tech Gadgets, Internet/Network Tips, And Technology At Large.
   A ndroid Device's are able to perform so much tricks and hacks via various methods either through a default app or a built app to perform a particular trick or hack. This tricks and hacks have enabled Android users to enjoy their smartphones to the extent they swear never to leave the Android platform for any other.


One of these tricks discovered and put to test by geeks, is how to change the IMEI Number of your Android smartphone. This trick has both it's advantages and disadvantages. But unfortunately, there are high chances of escaping it's disadvantages. So today, I shall tutor you on how to change the IMEI Number of your Android smartphone. Firstly let us look into the meaning of IMEI, it's uses, and also it's benefits.

         WHAT IS AN IMEI NUMBER?

The International Mobile Equipment Identity (IMEI), is a unique identification or serial number, which all mobile phones and smartphones devices must have, to help in tracking or for the use of other IMEI related stuffs. You can search on the net for better explanations. This number is normally 15 digits long, and can be found on the silver sticker on the back of your mobile phone underneath the battery pack or on the box your mobile phone comes with.

See The: Top 7 Wi-Fi Hacking Apps For Android Devices
WHAT ARE THE USES OF AN IMEI NUMBER?

An IMEI Number has so many uses, but I'll list only a few of it's major uses. They are:

  • An IMEI Number is used for the trace of a mobile phone.
  • An IMEI Number is used by networks to identify valid phones.
  • An IMEI Number is used to block stolen mobile phones from been accessed by the thief, by stopping the certain phone from accessing the network, thereby rendering the phone useless.
  • An IMEI Number can be used to to retrieve the unlock code of a mobile phone.
Now before you change the IMEI Number of your mobile phone or smartphone, there must be a reason or benefits attached.

Now I'll list a few benefits of changing the IMEI Number of your mobile phone or smartphone. They are:
  • Getting free data which ranges from 1GB - 5GB or bonuses from your GSM Networks.
  • Opportunity of receiving double data whenever you purchase any valid data subscription plan.
This sounds good right? Well for you to enjoy this, you must know how to change the IMEI Number of your Android device.

There are different ways of changing the IMEI Number of an Android device via various types of applications and tools, but the most secured, efficient and simplest way of changing the IMEI Number of your Android device, is using the MTK Engineering Mode App.

HOW TO CHANGE THE IMEI NUMBER OF AN ANDROID DEVICE USING MTK ENGINEERING MODE APP

                Requirements:
  • A Rooted Android Device 
  • MTK Engineering Mode App. Download it Here.
  • IMEI Analyzer App. It's used to generate and check the validity of an IMEI Number. Download it Here.
  • Read How to use the IMEI Analyzer app Here.
Follow The Below Steps To Change The IMEI Number Of Your Android Device
1. Launch The MTK Engineering Mode App.

2. Slide left to CONNECTIVITY


3. Click on CDS Information 

4. Then Click on Radio Information 


If you're using an Android device with dual SIM slot, then know that "PHONE 1" represents your SIM 1, while "PHONE 2" represents your SIM 2. Now choose the slot you want to change it's IMEI Number.


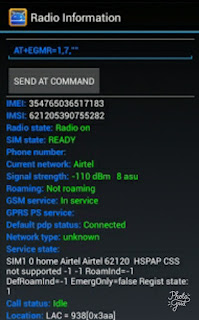
5. When you're done choosing your desired slot, then click on the "AT+" you see there.


6. Your keyboard will appear. Then you type the letter "e" on your keyboard. A pop-up box will immediately appear.


7. Then click on AT+EGMR=1,7"" if you chose "PHONE 1" as your Slot, or click on AT+EGMR=1,10"" if you chose to "PHONE 2" as your desired Slot. Then make a space inbetween the AT and +


8. Then inbetween ("") type in the IMEI Number which you're changing to.


9. Check if the numbers are correct. If you have cross checked, then click on the "SEND AT COMMAND". If you receive a message saying "AT Command
Sent And Successful", then it's successful.

Now what you have to do is to reboot your phone. After your phone powers ON, check your new IMEI Number
by dialing *#06#. Then you would see a box showing you your two IMEI Numbers.
New: Download Latest GB WhatsApp v5.90
But take this warning that you should always backup your real IMEI Number before changing it to any other IMEI Number. Screenshot or write it down on a piece of paper incase anything goes wrong, you can quickly change it back.

That's all about changing the IMEI Number of an Android device.

Kindly drop a nice comment if it works for you. If you face any problems, drop your questions, and I will help you out. Thanks And Enjoy...
A Blog Concerning All Updates On Tech News, Blogging Tips, New Tech Gadgets, Internet/Network Tips, And Technology At Large.
    S ome Android Device owners do complain of their Device e GPS automatically turning On when mobile data is enabled. That made me to do some researches which would help to solve that problem.
But first and foremost before we look into the solution to this problem, we should know some basic things like: What's The Meaning Of GPS, Why GPS Is Important, How To Enable And Disable Your Mobile GPS, and Why Your Mobile GPS Keeps Turning On Automatically.
READ MORE: How To Fix A Bricked Android Device 
Lets start with:

                 WHAT IS GPS?

GPS which stands for "Global Positioning System", is a satellite system that provides  geolocation and time information to a GPS receiver anywhere or near the Earth where there is an unobstructed line of sight to four or more GPS satellites.

It can also be Known as a system which is integrated into your Android Device to enable Satellites Land by Extension, applications, to track your device location.
I hope this is well understood.

        IMPORTANCE OF GPS

  • Track Lost People, Phones, Animals, and Items.
  • Websites and Social Media Applications Makes Use Of It To Personalize Your User Experience.
  • Know Where You're If You're Lost To Help Find Your Way.
These above are the most important uses and advantages of GPS.

HOW TO ENABLE AND DISABLE YOUR ANDROID DEVICE GPS

Step 1: Goto Your Phone Settings.
Step 2: Scroll Down And Find "Location".
Step 3: Click on it. There you can Toggle On or Toggle Off / Check or Uncheck / Enable or Disable your GPS. That's it.
Quite easy, isn't it??

WHY DO YOUR DEVICE GPS KEEP TURNING ON AUTOMATICALLY?

Yes there are reasons why your GPS keeps turning On when mobile data is enabled. Time to know them.
They are:
  • You failed to disable your device GPS. This is common among those who are new to Android or IOS devices.
  • An application you installed that requires GPS always keep turning it on.
The second reason above is the most common cause (except in the case of some China mobile devices which are produced with pre-loaded spyware).
Most of these applications are root apps which is why its advisable not to root your Android Devices, though I rooted mine lol.

Now lets look into the main topic of this article, which is how to fix that problem of your Android Device GPS automatically turning On.
READ MORE: Two Best Apps For Downloading Premium Applications

HOW TO FIX AN ANDROID DEVICE WHICH GPS AUTOMATICALLY TURNS ON

  • Uninstall Suspicious Applications: There are apps which do continue to enable your device GPS. What they do is to override your set preferences to keep auto-enabling your GPS. If you know about Adware which do auto-enable your device mobile data to keep downloading unwanted applications and also popping irrelevant adverts and unfortunately sending your device some virus, then you will understand what am talking about. Now look for applications which you recently installed before the GPS problem started and uninstall them.
  • Factory Reset: A factory reset simple means when your android or mobile device user data, settings and installed applications is been wiped. This makes your device look brand new (not the outward appearance). A factory reset is the most easiest way to solve the problem of this GPS. 
How To Do A Factory Reset:

Step 1: Goto your phone settings.
Step 2: Scroll down and find "Backup & Reset"
Step 3: Click on it. That's it.

  • Selective Freeze /Disable Applicatons: Get or download Greenify Task Manager Application. Then freeze your applications one at a time so you identify the apps which are responsible for auto-ebabling your device GPS. Your device GPS function will behave normally when you disable such applications and it will begin mis-behaving when you enable those applications.
  • Format And Reflash Your Device Factory Custom ROM: Some of these applications that do cause this GPS issue do try to avoid removal and to do that, they hide in the systems/applications folder. What's the assurance that a normal factory reset would get rid of those apps?? No assurance. So what you will need to do is to format/wipe your device and then re-flash the custom/stock ROM. This exact method to use will depend on the device processor type (chipset).
These above listed methods will definitely fix your GPS problem. They are all tested/experimented so be calm.

But have you ever thought of how you can monitor the GPS activity of your Android device??
If yes, then that's  a good thought you have there.
Yes if you can be able to monitor your GPS activity, then you can also locate that culprit which keeps auto-enabling it.
Now download OS Monitor application and monitor your GPS Activity.

Drop a nice comment if this article was helpful to you and also do share for the benefit of others.

Thanks and Enjoy...
A Blog Concerning All Updates On Tech News, Blogging Tips, New Tech Gadgets, Internet/Network Tips, And Technology At Large.
    T he word "Bricked" may not be new to you. You may have heard about it or may have thought that your phone is bricked, especially if you flash a ROM or Root your android phone from time to time. But unfortunately, not all user has a clear understanding of what a bricked phone really means, and more importantly, how to fix a bricked phone. This article will give a full introduction of what a bricked phone is, why an android phone gets bricked, and how to fix a bricked android phone without data loss.


WHAT IS A BRICKED PHONE: Soft Brick Or Hard Brick?

A Bricked Phone Is A Phone Which Refuses To Boot Properly Or Refuses To Boot Atall. Now there are two types of Bricking which are: Soft Brick, and Hard Brick. Now I am going to explain the both of them to you.
READ MORE: TWO BEST APPS FOR DOWNLOADING PREMIUM APPLICATIONS
Soft Brick

When you say a phone is Soft Bricked, it simply means that the Phone Do not Boot Up/Turn On Properly. The Phone Tries To Boot Up but immediately Turns Off By itself or it Remains Permanent in the booting state until the battery is removed to turn it off. Let me make this simple for you to understand easily. Below are the common symptoms of a Soft-Bricked Android Phone:

  • The Android Device is Stuck at Boot Loop.
  • The Device is Frozen on Boot Screen.
  • The Android Device boots Directly into Recovery Mode.
  • The Device gets a white or black screen.
Hard Brick

When a Phone is Hard Bricked, it simply means that the phone refuses to boot or power on in any way. You keep on pressing the Power Button, but nothing happens, no form of light. The phone is really dead. A Hard Bricked Phone is 99% unrepairable. The remaining 1% is for the owner to try his/her luck by turning to a Repair Service or going straight to the carrier's/manufacturer's store to swap the phone.

Good you now know what a bricked phone is, and the two types of bricking with full explanations. Now lets move to the next phase.

WHY AN ANDROID PHONE GETS BRICKED?

There are varieties of reasons why an android device gets bricked. Now I will list and explain them in details.
  • Flashing A Custom ROM: It could be that an incompatible ROM was installed into the Android phone, then the phone powers off in the process or then the phone begins restarting itself endlessly, or also gets stuck at startup screen.
  • Rooting The Android Phone: A phone gets bricked when its not properly rooted. This has been a major problem to some peeps who fail (do not know how) to root their phone's properly. I endeavour peeps who likes root their android devices to read guides on how to root an android phone and follow all the steps accurately using the mobile application created for that purpose to avoid falling victims. 
  • Updating Android Firmware: An Android Device will get bricked if it's interrupted when updating the Android Firmware, so take caution. I suggest you do your updates at Mid-Nights.
  • Installing Malicious Software: An Android phone gets bricked if a malicious software is intalled in it or if it gets attacked by a Virus.
Now I believe you now know the Reasons why an Android Phone gets Bricked, so I advice you take caution and totally avoid those things which gets and Android Phone Bricked. Lets Move To the Next Phase.

HOW TO FIX A BRICKED ANDROID PHONE WITHOUT DATA LOSS

To get a bricked phone fixed, there are various softwares to achieve that purpose. The best is a software called Broken Android Data Extraction. The software is capable of bringing Android Bricked Phone back to normal and it also recovers data from screen-broken cell phone. I will also list and explain two more softwares you should also know. They are:
  • Powerful:  This software can be used for fixing bricked, frozen, and system crashed android phone's. It can also be used in recovering the data of a phone with broken/unresponsive screen.
  • Easy-To-Use: This software enables the fixing of a bricked phone with few clicks. It saves much time and effort if you get overwhelmed by complicated DIY methods.
Now These Are Softwares which helps in unbricking a phone. Now I will talk about the Supported Devices These Softwares work For.

Supported Android Devices

The Broken Android Data Extraction Software can only currently work in Samsung Devices. More models and brands will be created/supported in the future to come. Below are the supported Samsung device models:
  • Samsung Galaxy Note: Note 3, Note 4, and Note 5
  • Samsung Galaxy S: S4, S5, and S6
  • Samsung Galaxy Tab: Tab Pro 10.1
Those devices above are the supported Devices for Broken Android Data Extraction. Now lets move to the Next Phase.

Specific Steps To Fix A Bricked Android Device

Step 1: Launch the Broken Android Data Extraction Software on your Windows PC and choose Broken Android Data Extraction on the left side.

Step 2: Now connect the phone to your PC and click on "Fix Device".

Step 3: Now you will see five different options and each of them are of different situations. The five options are: Stuck In The Start Up Screen, Stuck In The Download Mode, Stuck In The FonePaw Interface, Black Screen, Others. Now what you have to do is select the the Option that fits your situation and the program will provide solution accordingly.

Step 4: Unbrick Android Device In Two Cases:

Case 1: If you had choosen "Stuck In The Start Up Screen"/"Black Screen"/"Other", then select the Device Name And Model of your phone from the drop-down list and the click on "Confirm".
Then Follow the Instruction on the program to put your phone in the Download Mode. Then click on "Start" to begin to Unbrick the Phone. The program will start to download the proper recovery package and repair the phone. Your Device will restart automatically and be back to normal.

Case 2: If you had choosen "Stuck In The Download Mode"/"Stuck In The FonePaw Interface", then click "Next", then the program will automatically reboot your device and get it out of the Frozen Screen.

If your phone is not supported, or if the problem you are facing is not covered by the program, please I would advice you not to try anything, just wait till a program that supports your phone is created or you go meet the carrier's/manufacturer's of your phone for a possible swap.
Good you now know what a bricked phone is, the two types of bricking with explanations, and how to fix a bricked android phone.

If this Article was Helpful to you, kindly comment and also help us share this article.

You can Like Our FB Page by clicking HERE

              Thanks And Enjoy...
A Blog Concerning All Updates On Tech News, Blogging Tips, New Tech Gadgets, Internet/Network Tips, And Technology At Large.
    G oogle Playstore app is a Software app Created by Google to allow users download all sorts of applications, few musics, videos, magazine, books, e.t.c. This App works on all android Operating System.

Google playstore Has variety of apps for downloads, (Free And Paid). The Free apps are those which you download using your mobile data, while the Paid (Premium) Apps are those which requires downloads using your money (Real cash). I'm sure you know that Paid (Premium) apps are much more better than the free apps in terms of quality and other stuffs which makes them Premium.


All Android Users do want to download premium apps for free. Nobody wants to spend a dime to enjoy lol. But yes you can download those paid apps for free. Yes you wont spend a dime to download those premium apps. I am sure you ask the question (How?) in your mind. So yes, let me tell you how by introducing these two best Apps which you can use in downloading these premium apps for free.
They are: AppVn App
                  Blackmart Alpha App


Now lets get started by introducing AppVn App, It Features And How To Download any premium app using it.

                          APPVN

AppVn app is an app store where you get and download thousands of apps, be it games, educational apps, pic editor apps, e.t.c which you may or may not find on Google Playstore. It is a third party app which you can easily find apps to beautify and enhance your rooted android device. AppVn  can be used to get and download apps on all platforms of operating system such as; Android, IOS, Windows.

FEATURES OF APPVN 

  • Easy to use.
  • Download Paid (Premium) Apps For Free.
  • Updates and introduces the newest apps as soon as they are out.
  • AppVn has apps for both Android and IOS operating system and works flawlessly on them.
READ MORE: HOW TO INCREASE THE RAM OF YOUR ANDROID DEVICE USING MICRO SD CARD

HOW TO DOWNLOAD PREMIUM APPS FROM PLAYSTORE USING APPVN

  • Step 1Install AppVn app in your Device.
  • Step 2Goto Google Playstore And Locate The Paid (Premium App)
  • Step 3Scroll Down, you will see an option written as SHARE. Click On it.
  • Step 4A pop-up menu will then appear showing you apps to share it on (mainly browsers and social media apps).
  • Step 5You will see AppVn app among them. Click on it.
  • Step 6You will be directed into AppVn app, and then you will see the Paid app to download. Click on it and boom you are downloading the Premium app without spending a dime. Dowload AppVn Application below.

That's it For AppVn. Enjoy.

             BLACKMART ALPHA

BlackMart Alpha App is an app store just like Google Playstore. Unlike Google Playstore, BlackMart Alpha allows you to download all the available apps on the Black market alpha (both free and premium) for free. There are no restrictions for downloading apps onto your android and IOS devices. You get to download all apps for free without spending a dime. The Blackmart Alpha app is much more better than the AppVn app because of its simple procedures/operations.

 FEATURES OF BLACKMART ALPHA

  • Easy to use.
  • Fast Downloads
  • Fast Installations
  • Multi-Language option
  • Download Premium (Paid) apps without spending a dime.
READ MORE: HOW TO FIX ERROR OF "UNFORTUNATELY GOOGLE PLAYSTORE HAS STOPPED WORKING"

HOW TO DOWNLOAD PREMIUM APPS USING BLACKMART ALPHA

  • Step 1Install Blackmart Alpha app in your Device.
  • Step 2Click on the search button at the top of the app.
  • Step 3Search the name of the app you wanna download. You will see both the free and the premium of the app appear.
  • Step 4Click on the premium app you wanna download.
  • Step 5Choose the version you want if there is a list of versions. But note that the version at the top is the latest version.
  • Step 6Click Install, Boom you are downloading the Premium app without paying a dime. Download BlackMart Alpha application below.

 That's it for BlackMart. Enjoy.

Hope This Tutorial Helps You. If it works for you, (which I know it will) why dont you drop a nice comment and also Remember To share this post for the benefit of others to appreciate our effort, Remember sharing is caring and also your comments keeps us going.

Like Our FaceBook Page By Clicking HERE

                            ENJOY.
A Blog Concerning All Updates On Tech News, Blogging Tips, New Tech Gadgets, Internet/Network Tips, And Technology At Large.
    M any Android Smartphone users may have faced the problem of insufficient RAM (Random Access Memory) space issue, whenever they play big games or whenever they are running a high-end application (huge file applications) on their Android devices. The phone most of the time gets hanged (screen refusing to operate) and they you will have to just restart the phone (sometimes you must have to remove the battery and put it back to restart), or the phone do get heated when running such applications because of the little RAM storage. 

And there is no possibility of increasing the smartphone RAM by any form of upgrade, but this article provides the solution in increasing the RAM of your Android device by using the Secondary (external) storage, which is also known as the Micro SD Card.
But before we look into that solution, its good we get some important information that would be helpful to us. Lets know what a RAM (Random Access Memory) is before we proceed.


               WHAT IS A RAM?

A RAM (Random Access Memory) is a place in a computing device where the operating system (OS), application programs and data in current use are kept so that they can be quickly reached by the device's processor. It can also be known as a form of computer data storage which stores frequently used program instructions to increase the general speed of a system.
READ MORE: HOW TO FIX ERROR OF "UNFORTUNATELY PLAYSTORE HAS STOPPED WORKING"
The Benefit Of Having A Big RAM Or Increasing Your RAM Is:

  • Multi-Tasking: Additional RAM actually makes your Phone or Computer to do more than one thing at once without it getting hanged.
  • Makes the devices faster.
  • Run huge files applications.
  • No problem of phone over-heating (except your system quite has a problem.)
  • Installation of countless applications.
These are just the main benefits of having a bigger RAM or increasing your RAM.

Now lets get into the main topic of this article, which is how to increase Your RAM space using Micro SD Card.

Now for the possibility of increasing the RAM of your Android device, you need to install and run an application which is called ROEHSOFT RAM EXPANDER (SWAP). This application is developed to allow low RAM android users to create partitions on the Micro SD Card so they can utilize/make use of their Micro SD Card as an extended RAM. This actually means that, the more space on your Micro SD Card utilized, the more extended virtual RAM you will get for your Android Device.

Lets just have a look at the features which this application offers.

FEATURES OF Roehsoft RAM Expander (Swap) Application
  • Using Micro SD Card as extended RAM use.
  • There's no limit of SWAP partition.
  • RAM expansion is upto 4GB.
  • Detailed Memory Info.
  • Supports all Android devices.
These listed above are the features of this application.
Now lets see how to increase the RAM of your Android device using this application.

HOW TO INCREASE THE RAM OF YOUR ANDROID DEVICE USING ROEHSOFT RAM EXPANDER APP

Make sure you have upto 4GB storage space on your Micro SD Card.
  • Step 1: Goto Google Playstore on your android device and download MemoryInfo & Swapfile Check (they are not really necessary though).
  • Step 2Check your device compatibility (not a must because its compatible with all Android device). A rooted Android device is needed.
  • Step 3: Check on Google Playstore for ROEHSOFT RAM EXPANDER application or download it below.
  • Step 4: Install the application after downloading.
  • Step 5: Now open the ROEHSOFT RAM EXPANDER application.
  • Step 6: Now click on Swap Active so it can create a swap file and also enable it.
  • Step 7: Click on the option Active Swap and you're done. Congratulations!!! your Android device RAM is increased via your Micro SD Card.
Below is a view of the application incase you somehow get confused.


Note that this has been experimented/tested by me before I wrote this article. If you follow the above steps carefully and correctly, you would get your desired result.

If this post was helpful to you, kindly drop a nice comment and also share the link to this article  for the benefit of others who may be affected.

You can also like our FB Page via HERE

Thanks And Enjoy...